
Mastering Photography: A Step-by-Step Guide for Amateur Photographers to Shine in the Preston Valley Photography Competition
Photography is a beautiful blend of art and science, where creativity meets technique. If you're gearing up for the Preston Valley Photography Competition, you're probably looking for ways to refine your skills and capture that perfect shot. With the subject of this year’s competition being ‘Trees’, there’s a world of natural beauty waiting to be captured. In this guide, I’ll share practical steps and insights gained from over 20 years behind the lens to help you elevate your photography and stand out in the competition.
Step 1: Understanding Your Camera
Before you can create stunning images, it’s crucial to get to grips with your camera. Whether you’re shooting with a DSLR, mirrorless camera, or even a smartphone, understanding the basics is the foundation of good photography. While most cameras and phones can take great photos in auto mode, you can always improve the photo by understanding the basics.
Know Your Gear
Start by familiarising yourself with your camera’s manual settings. Automatic modes are handy, but real creativity happens when you take control. (Below is a quick video on using your smartphone in manual mode to improve your photos).
Essential Settings
ISO
Controls your camera’s sensitivity to light. Lower ISOs (100-200) are ideal for bright daylight, while higher ISOs (800 and above) can be useful in low light but may introduce noise. (Noise = Grainy photos be examples below)

ISO Cheat Sheet

ISO Example
Shutter Speed
Affects how motion is captured. A fast shutter speed (1/500s and above) freezes movement, while a slower one (1/30s or below) can create beautiful motion blur in swaying branches. (Below is an example of shutter speed and how it can affect your images).

Shutter Speed Cheat Sheet

Shutter Speed Example
Aperture
Dictates the depth of field. A wide aperture blurs the background of an image, this is known as a shallow depth of field (DoF). While a narrow aperture keeps the whole scene sharp and is known as a Large or Wide DoF. Aperture is also known as a F-Stop - for example a wide aperture is an F2, and a shallow or small aperture is F16.
Below in the example is my dog, Monty, standing in front of the Donnybrook sign at the river crossing. You will see that in the first photo, the Donnybrook sign is sharp and in the second, it is blurry.
Did you know that the blur in a photo background is known as bokeh.
Pro Tip: The larger the number the shallower the depth of field, this is handy to remember!

Aperture Cheap Sheet

Aperture Example
Practice Exercise
Head to your local park or woodland and photograph the same tree using different ISO settings, shutter speeds, and apertures. Notice how each setting changes the look and feel of the image.

Exercise Example
Step 2: Mastering Composition
Composition is where the artistry of photography truly shines. A well-composed image draws the viewer in and tells a story.
Rule of Thirds
Imagine your frame divided into nine equal parts by two horizontal and two vertical lines. Place key elements of your image, like the trunk or the canopy of a tree, along these lines or at their intersections to create a balanced, engaging photo.
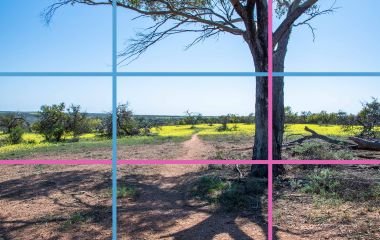
Rule of Thirds Example
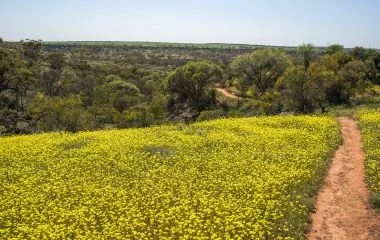
Leading Lines
Use natural lines, such as a path through the woods or the curve of a river, to lead the viewer’s eye towards your main subject. This technique is especially effective in forested areas, where lines can guide viewers through the complexity of the scene. (Below are some leading lines examples.)


Framing
Look for opportunities to frame your subject using other elements in the environment. Overhanging branches, a gap in the trees, or even the edge of a clearing can all be used to create a natural frame around your subject, adding depth to your image. (Example below: In this photo I used the tree to frame the scene).
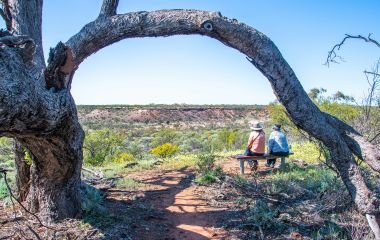
Framing Example
Practice Exercise
Spend an afternoon exploring different ways to compose your shots. Photograph a single tree using the rule of thirds, then try framing it with other elements in the scene. Experiment with leading lines by positioning yourself so that a path or row of trees guides the viewer's eye directly to your subject.
Step 3: Lighting Techniques
Lighting is one of the most crucial aspects of photography, and mastering it can dramatically improve your images.
Natural Light
In outdoor photography, the quality of light can make or break a shot. The golden hour—just after sunrise or before sunset—provides soft, warm light that can make trees glow. Avoid the harsh midday sun, which can create unflattering shadows and overly bright highlights.

Natural Light Example
Artificial Light
If you’re shooting in a dense forest, on a cloudy day or at night, you might need to supplement natural light. A small portable flash or even a reflector can help to brighten up your subject and add a little extra sparkle to your image. (Example Below: here the lights of Kings Park have been used to highlight the trees in the foreground.)

Artificial Light Example
Understanding Shadows and Highlights
Shadows can add drama and texture to your photographs, especially when photographing trees with intricate bark or dense foliage. However, be careful not to lose detail in the shadows or blow out the highlights—balance is key. (Example below: Here you can see the shadows and highlights along the tree roots, it makes for a visually appealing photo.)
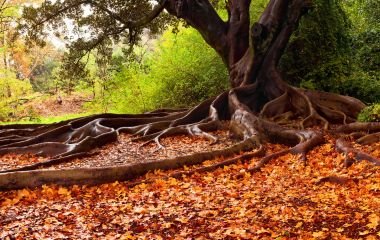
Shadows & Highlights Example
Practice Exercise
Photograph the same tree at different times of the day to see how the changing light affects the image. Pay attention to how the direction and quality of light enhance or detract from the tree's texture, colour, and overall impact.
Step 4: Exploring Different Photography Styles
The Preston Valley Photography Competition’s theme of ‘Trees’ offers a wide range of creative possibilities. Here’s how to approach different styles of photography within this theme.

Landscape Photography
When photographing a forest or a group of trees, consider the entire scene. A narrow aperture (f/11 or higher) will ensure everything from the foreground to the background is in focus. Pay attention to how the trees interact with the sky, the ground, and other elements of the landscape.
Portrait Photography
Yes, you can take portraits of trees! Focus on a single tree as your subject, isolating it from the background with a wide aperture (f/2.8-f/4). Capture its unique character—whether it’s the gnarled branches of an ancient oak or the graceful form of a young sapling.
Macro Photography
For a different perspective, get up close. Use a macro lens or the macro setting on your camera to capture the fine details of bark, leaves, or the intricate patterns of moss on a tree trunk. This style is all about texture and detail, so ensure your focus is spot-on.
Practice Exercise
Try each of these styles with a focus on trees. Start with a wide landscape shot, then move in closer for a tree portrait, and finally, capture the tiny details with macro photography. This will not only improve your versatility as a photographer but also help you discover which style resonates most with you.

Editing on the go.
Step 5: Post-Processing Essentials
Post-processing is where your photos come to life. It’s an essential part of the photography process, allowing you to enhance your images and correct any imperfections.
Basic Editing
Start with basic adjustments: cropping to improve composition, adjusting exposure to ensure the image isn’t too dark or too bright, and correcting white balance for accurate colours. If you’re new to editing, programmes like Adobe Lightroom offer user-friendly tools that make these tasks straightforward.
Enhancing Your Photos
Once you’ve made the basic adjustments, consider adding a touch of contrast to make your image pop, or slightly sharpening the details to enhance the texture of the bark or leaves. Be careful not to overdo it—subtle enhancements often yield the best results.
Practice Exercise
Select a few of your best tree photos and experiment with editing them. Start with the basics, then move on to more creative adjustments. Compare the edited images to the originals to see how post-processing can elevate your work.
Pro Tip: Canva free account offers the essential editing needs for a new photographer, so you do not need to spend money on software like Adobe.
Step 6: Preparing for the Preston Valley Photography Competition
With your skills sharpened, it’s time to prepare your entries for the competition.

Choosing the Right Photos
Select images that not only meet the technical criteria but also convey a sense of creativity and originality. Consider how each photo aligns with the competition’s theme of trees. Does the image tell a story? Does it evoke emotion? These are the photos that will stand out to the judges.
Submission Guidelines
Make sure you review the competition’s rules and submission guidelines carefully. Ensure your images are in the correct format and meet any size or resolution requirements. Missing a detail here could disqualify an otherwise excellent photo.
Final Checklist
Before submitting, go through a final checklist: Have you chosen your strongest images? Are they edited to perfection? Do they adhere to the competition guidelines? Taking the time to double-check everything can make the difference between a good entry and a winning one.
Conclusion
Photography is a journey, and every shot you take brings you one step closer to mastering your craft. By following these steps, you’ll not only improve your photography skills but also increase your chances of success in the Preston Valley Photography Competition.
Remember, the most important thing is to enjoy the process and let your creativity flourish.
Are you ready to showcase your best work? Apply the techniques from this guide, get out there, and capture the beauty of trees in all their glory.
Good luck in the competition—may the best shot win!

Written by Ellie Clare from